Pineapple Lemonade Candy Apples are the vibrant, citrus-infused evolution of a classic carnival staple. Imagine the sharp, tart snap of a Granny Smith apple enveloped in a glass-like shell of neon yellow candy that tastes exactly like a chilled glass of lemonade. This recipe transforms simple fruit into a gourmet masterpiece that looks like it belongs in a high-end confectionery boutique.
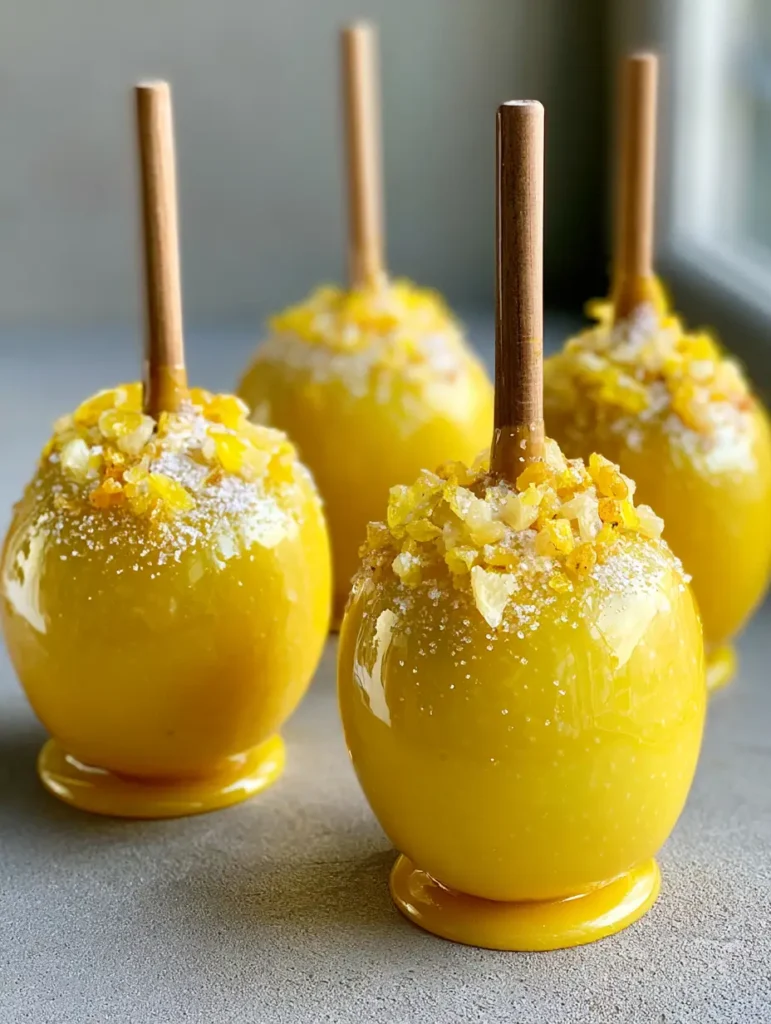
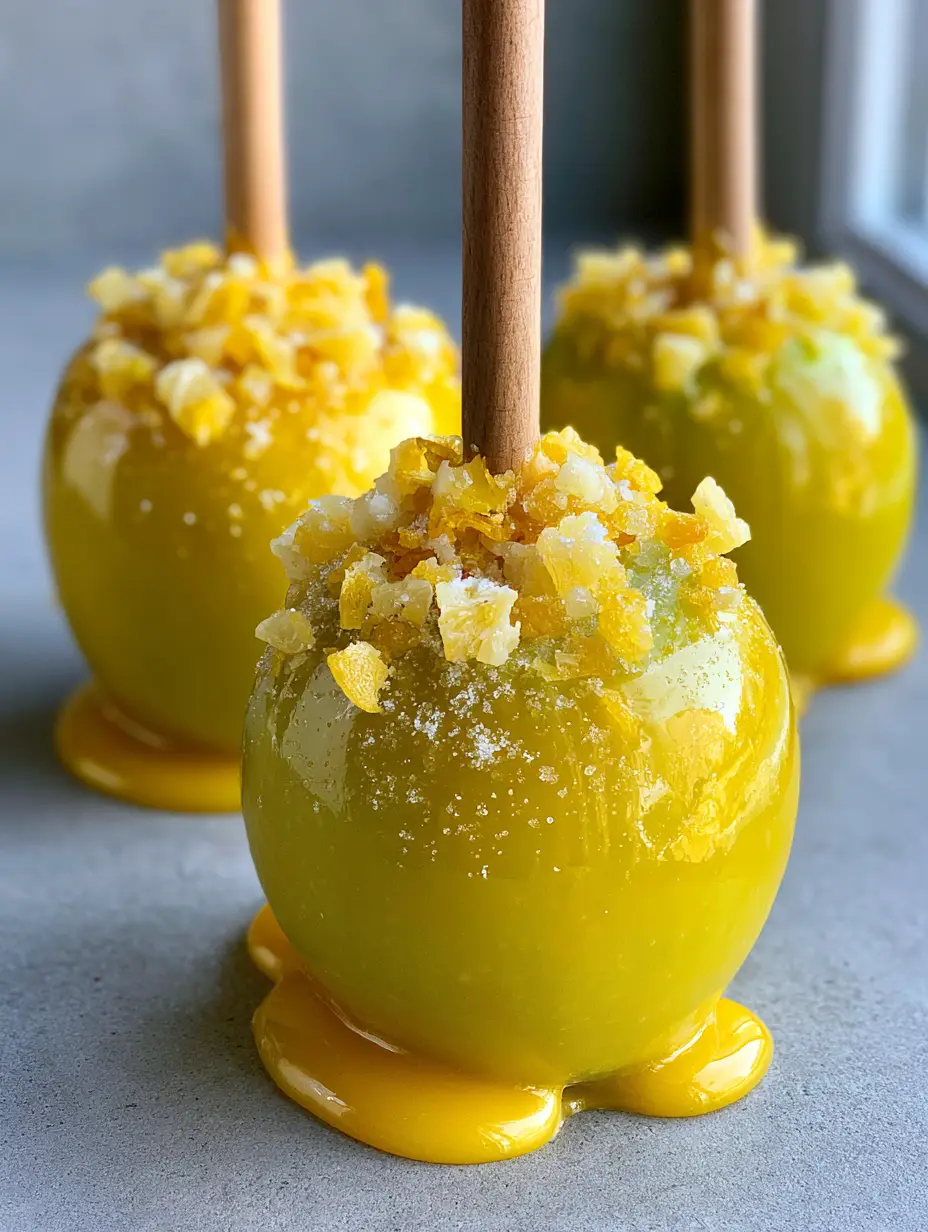
The visual appeal of these Pineapple Lemonade Candy Apples is undeniable. The translucent yellow glaze reflects natural light with a stunning, mirror-like finish that highlights every curve of the fruit. By garnishing the crown with dehydrated pineapple and candied lemon, we create a textural landscape that is as beautiful as it is delicious.
Whether you are hosting a summer garden party or looking for a unique gift, these apples provide a sensory experience that balances sweetness, acidity, and crunch perfectly. Let’s dive into the culinary science of sugar stages and tropical flavor profiles to bring this sunshine-yellow treat to your kitchen.
Why These Vibrant Tropical Apples Are a Total Showstopper
- Sensory Contrast: You get the cold, crisp crunch of the apple followed by the shatter of hard-crack candy and the chewy pull of dehydrated fruit.
- Gourmet Aesthetic: The vibrant yellow translucent glaze creates a professional, “boutique” look that is enhanced by the rustic wooden skewers.
- Perfect Flavor Balance: The “lemonade” acidity in the candy shell cuts through the heavy sugar, preventing the treat from feeling cloying.
- Photo-Ready Finish: The slight pooling of the glaze at the base creates a “designer” look that mimics professional food photography styles.
The Essential Grocery List for a Translucent Yellow Glow
Granny Smith Apples: You need 6 large, firm apples for this recipe. Their high acidity and sturdy flesh provide the necessary structure to support the heavy candy coating without softening.
Granulated White Sugar: 3 cups (600g) of high-quality sugar act as the primary structure for your candy. It provides the clean sweetness required for the lemonade flavor to shine through.
Light Corn Syrup: 1 cup (240ml) of corn syrup is a non-negotiable “interfering agent.” It prevents the sugar crystals from recrystallizing, ensuring your glaze remains smooth and glass-like rather than grainy.
Filtered Water: 1/2 cup (120ml) of water helps dissolve the sugar evenly during the initial heating phase. Using filtered water ensures no mineral impurities cloud the translucent yellow finish.
Yellow Gel Food Coloring: Use a high-potency gel rather than liquid coloring. Gel provides a vibrant, “lemonade” yellow without thinning out the sugar syrup’s consistency.
Lemon Extract or Citric Acid: 1 tsp (5ml) of extract or 1/2 tsp of citric acid powder gives the glaze its signature tang. This is what transforms a generic sugar shell into a true lemonade experience.
Dehydrated Pineapple Pieces: 1/2 cup (50g) of finely chopped dried pineapple provides a concentrated tropical punch. These should be small enough to adhere to the curved top of the apple.
Candied Lemon Peel Bits: 1/4 cup (30g) of minced candied peel adds a bitter-sweet complexity. The yellow bits blend beautifully with the glaze for a monochromatic, sophisticated look.
Fine Granulated Sugar: 2 tbsp (25g) of extra sugar crystals are used for the final “sparkle.” This adds a frosted appearance that catches the light and mimics the look of a sugared drink rim.
Must-Have Tools for Professional Confectionery at Home
Achieving a professional result requires the right equipment to manage high-heat sugar safely. You will need a heavy-bottomed stainless steel saucepan, which distributes heat evenly to prevent scorching the sugar. A reliable candy thermometer is your most important tool; the difference between a sticky mess and a glass shell is only a few degrees.
For the signature look, use 6 thick wooden skewers or bamboo sticks. These provide better grip and aesthetic appeal than thin plastic sticks. You will also need a silicone baking mat or a sheet of parchment paper generously greased with neutral oil to prevent the apples from sticking once they are dipped.
Prepping the Perfect Canvas: How to Clean Granny Smith Apples
The biggest failure point in candy apple making is the wax coating found on store-bought fruit. If you don’t remove this wax, the yellow candy glaze will simply slide off or develop unsightly bubbles. To fix this, bring a large pot of water to a simmer and quickly dip each apple for 5-8 seconds using a slotted spoon.
Immediately wipe the apples with a coarse kitchen towel. You will feel the “tackiness” of the skin once the wax is gone. Allow the apples to come to room temperature and ensure they are 100% bone-dry. Any moisture trapped on the skin will cause the syrup to pull away, ruining the translucent effect.
Mastering the Hard-Crack Stage for a Glass-Like Finish
Step 1: The Flavor Base
In your heavy saucepan, combine the granulated sugar, corn syrup, and filtered water. Stir gently with a heat-resistant spatula until the sugar is moistened, but avoid splashing crystals onto the sides of the pot. Once the heat is on, you will stop stirring entirely to prevent crystallization.
Step 2: The Temperature Climb
Clip your candy thermometer to the side of the pan, ensuring the bulb is submerged but not touching the bottom. Heat over medium-high. Watch for the mixture to begin bubbling vigorously. You are looking for the “Hard-Crack Stage,” which occurs between 300°F and 310°F (149°C – 154°C).
Step 3: Infusing the Lemonade Glow
Once the thermometer hits 300°F (149°C), remove the pan from the heat immediately. The temperature will continue to rise slightly. Stir in the yellow gel coloring and the lemon extract. Use a gentle folding motion to incorporate the color until the syrup is a uniform, vibrant, translucent yellow.

The Art of the Dip: Achieving That Signature Glaze Pool
Hold the skewered apple at an angle and submerge it into the hot yellow syrup. Rotate the apple quickly to ensure every millimeter of the green skin is encased in the glaze. Lift the apple and let the excess syrup drip back into the pan for a few seconds. Do not shake it, as this creates air bubbles.
Place the apple onto your silicone mat. As the apple sits, a small amount of the yellow glaze will naturally settle at the base, creating that beautiful “puddle” effect seen in gourmet food photography. This base provides stability and a concentrated burst of lemonade flavor.
The Tropical Finishing Touch: Garnishing Like a Pro
Timing is everything here. You must apply your garnishes while the candy is still hot and “tacky,” usually within 30 seconds of dipping. While the apple is resting on the mat, take a handful of the chopped dehydrated pineapple and candied lemon peel bits. Press them firmly into the top third of the apple, surrounding the wooden skewer.
The heat of the candy will slightly soften the dried fruit, helping it bond to the shell. Finally, sprinkle the fine granulated sugar crystals over the top. This creates a “frosted” texture that contrasts beautifully with the smooth, reflective yellow surface below.
Pro Tips for Avoiding Bubbles and Stickiness
- Room Temperature is Key: Never dip cold apples. The temperature shock creates condensation under the candy, leading to “slippage.”
- The Ice Water Test: If you don’t trust your thermometer, drop a bit of syrup into ice water. It should instantly form brittle threads that snap when bent.
- Work Fast: Sugar cools rapidly. If the syrup becomes too thick to dip, return it to low heat for a minute to loosen it back up.
- Pop the Bubbles: If you see small air bubbles in your syrup after stirring in the color, let the pan sit for 60 seconds to allow the air to rise and dissipate before dipping.
Keeping the Crunch: Storage and Longevity
Pineapple Lemonade Candy Apples are best enjoyed within 24 hours. Because the candy shell is essentially sugar, it is hygroscopic—meaning it absorbs moisture from the air. In humid environments, the shell will begin to feel “sticky” or “weeping” after a day.
Store your finished apples in a cool, dry place. Do not refrigerate them unless your home is very warm, as the humidity in the fridge can dull the glossy finish and cause the candy to dissolve. If you must transport them, wrap them individually in cellophane bags once they are completely cooled and hardened.
Tropical Pairings: What to Serve Alongside These Treats
These apples are a star on their own, but they also fit perfectly into a larger tropical-themed spread. If you’re hosting a party, consider serving them alongside some moist pineapple bread to double down on the tropical vibes. The sweet-tart profile also complements savory dishes like a Huli Huli chicken stack.
For a festive dessert table, these yellow beauties look incredible next to glowing cotton candy jars, creating a neon-inspired aesthetic that guests will love. If you want to keep the snack theme going, a side of brownie bottom cheesecake bites provides a rich, chocolatey balance to the citrus zing of the apples.
Frequently Asked Questions
Lemon juice contains too much water and can prevent the syrup from reaching the hard-crack stage properly. Use lemon extract or citric acid powder for a concentrated flavor without the moisture.
You must remove the food-grade wax from the apples by quickly dipping them in boiling water and drying them completely. Moisture and wax are the enemies of candy adhesion.
They are best within 24 hours. Humidity will cause the sugar shell to break down and become sticky if left out for longer.
Bubbles are caused by stirring the syrup too much once it’s hot, or by dipping cold apples. Ensure your apples are room temperature and let the syrup sit for a minute after coloring to let bubbles rise.
This usually means the syrup didn’t reach the full ‘Hard-Crack’ stage of 300°F-310°F (149°C-154°C). If the temperature is too low, the sugar remains pliable and sticky.
How to Make Gourmet Pineapple Lemonade Candy Apples
Pineapple Lemonade Candy Apples: The Ultimate Tangy Tropical Treat
Ingredients
Equipment
Method
- Dip apples in simmering water for 8 seconds to remove wax. Wipe dry and insert thick wooden skewers into the stems.
- Prepare a silicone mat and have your pineapple, lemon peel, and sugar crystals ready in small bowls.
- Combine sugar, water, and corn syrup in a saucepan. Heat without stirring until it reaches 300°F (149°C).
- Remove from heat. Gently stir in yellow gel coloring and lemon extract until the mixture is a translucent vibrant yellow.
- Tilt the pan and swirl each apple in the syrup until fully coated. Allow excess to drip briefly.
- Place on mat. Immediately press pineapple pieces and lemon peel into the top. Dust with sugar crystals while the glaze is still tacky.
Notes
Use a high-quality candy thermometer for the 300°F hard-crack stage.
Share Your Tropical Creations with Us!
There is nothing quite as satisfying as the sound of that first “crack” when you bite into a perfectly tempered candy apple. These Pineapple Lemonade Candy Apples are a testament to how simple ingredients like sugar and fruit can be elevated into a gourmet experience with a little bit of culinary science.
If you loved this recipe, please leave a comment below and let us know how your vibrant yellow glaze turned out! Don’t forget to follow us on Pinterest for more visually stunning dessert inspiration. Pin this recipe to your “Summer Treats” or “Gourmet Desserts” board so you can find it whenever you need a splash of sunshine in your kitchen!
Check out our latest creations at CrispCrumbs for more expert baking tips and high-flavor recipes!
: https://res.cloudinary.com/defr7mpee/image/upload/v1779386893/pineapple-lemonade-candy-apples_1779386892.jpg
: https://res.cloudinary.com/defr7mpee/image/upload/v1779386893/pineapple-lemonade-candy-apples_1779386892.jpg


