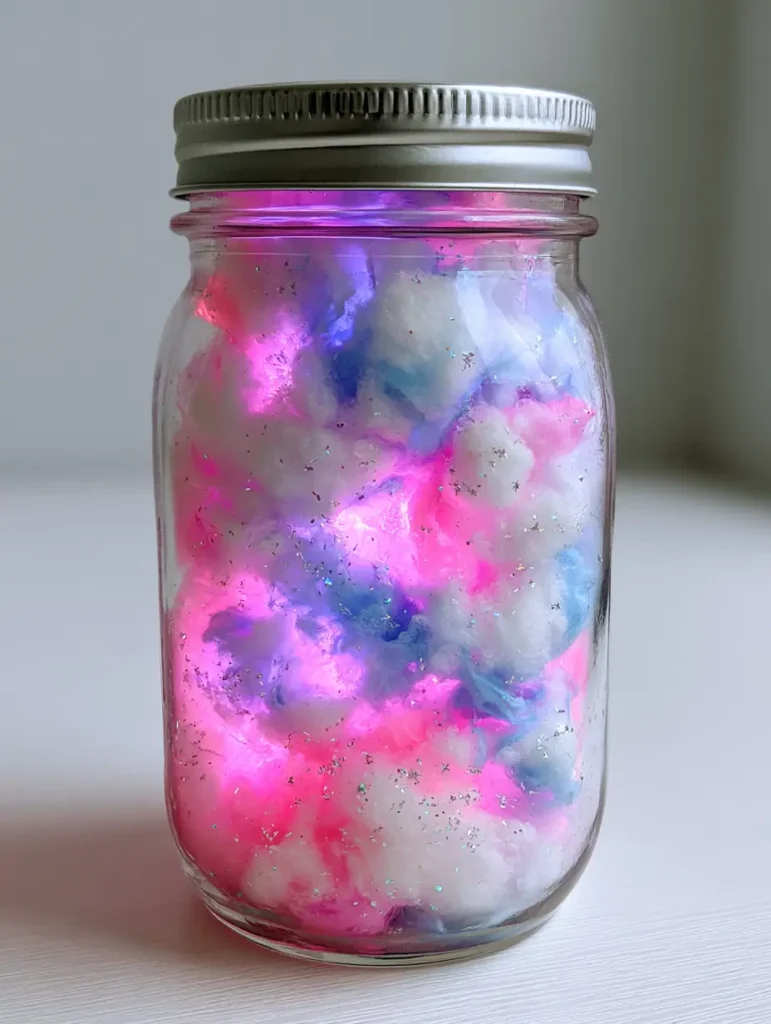
Transform your living space into a whimsical wonderland with these stunning DIY Cotton Candy Glow Jars. This project captures the ethereal beauty of spun sugar and the mesmerizing brilliance of neon lights in a simple, clear glass mason jar.
Whether you are looking for a unique centerpiece or a calming nightlight, these DIY Cotton Candy Glow Jars offer a soft magenta and azure radiance that feels both modern and magical. The secret lies in the layering of damp, fibrous textures and vibrant liquid pigments.
Why You Will Love This Luminescent Craft Project
- Visually Mesmerizing: The marbled swirl effect of neon pink and pastel blue creates a professional, artistic finish that looks incredible in any lighting.
- Tactile and Textural: Using compressed white cotton balls provides a unique, damp, and fibrous texture that mimics the look of real cotton candy.
- Stellar Shimmer: Fine iridescent silver glitter is scattered throughout the fibers, appearing like tiny stars trapped within the jar.
- Customizable Glow: A hidden LED light source creates a multi-dimensional glow that filters through the glass and silver metallic lid.
The Anatomy of a Glow Jar: Essential Components
Compressed White Cotton Balls (Approx. 100-150 count): These serve as the foundational structure, absorbing the dye and holding the glitter in place. Ensure they are 100% cotton for the best saturation and “fluffy” visual appearance.
Neon Pink and Pastel Blue Liquid Dyes (15ml / 1 tbsp each): These pigments provide the vibrant “Cotton Candy” color palette. The liquid format is essential for creating the damp, marbled swirl effect required for the glow to diffuse properly.
Iridescent Silver Glitter (5g / 1 tsp): This adds a celestial dimension to the jar. We recommend a fine-grain glitter so it nestles deep within the cotton fibers rather than clumping on the glass.
Distilled Water (240ml / 1 cup): This is the invisible medium used to dilute the dyes. Using distilled water prevents mineral buildup and keeps the colors clear and vibrant over time.
Submersible LED Glow Light (1 unit): This is the heart of the project. Choose a small, battery-operated LED that fits comfortably at the base or center of your mason jar.
Clear Glass Mason Jar with Silver Metal Lid (1 pint / 473ml): The clear glass ensures maximum visibility of the marbled colors, while the silver lid provides a clean, metallic finish.
Essential Tools for Crafting Your Glow Jars
To achieve the precise layered assembly shown in our visuals, you will need a few basic tools. A long wooden skewer or chopstick is vital for compressing the cotton and guiding the liquid dye into the crevices. Small mixing bowls are needed to prepare your pink and blue pigments, and a pair of tweezers can help in placing the LED light or adjusting glitter placement.
Step-by-Step Guide to the Perfect Cotton Candy Swirl
Preparing Your Pigment Palette
In two separate small bowls, mix 120ml (1/2 cup) of distilled water with your liquid dyes. Use enough neon pink in one and pastel blue in the other to reach a high-saturation level. You are looking for a deep, ink-like consistency that will eventually soften when absorbed by the white cotton.
Building the Foundational Base
Place your LED light at the very bottom of the mason jar, ensuring it is turned on so you can see the light dispersion as you work. Begin packing the compressed white cotton balls around the light. Use your skewer to press them down firmly; the goal is a dense, damp cotton texture that doesn’t have large air gaps.
Executing the Marbled Swirl Technique
Slowly pour a small amount of the neon pink liquid over the first layer of cotton. Follow immediately with a sprinkle of iridescent silver glitter. Add another layer of cotton balls, then pour the pastel blue liquid. Continue this alternating pattern, using the skewer to “swirl” the colors where they meet, creating that signature magenta and azure radiance.

Sealing the Celestial Vessel
Once you reach the top of the jar, add one final sprinkle of silver glitter. The cotton should feel damp to the touch but not be swimming in excess liquid. Wipe the rim of the glass to ensure a clean seal, then screw on the silver metallic lid tightly to preserve the moisture and texture.
Expert Tips for a Professional Finish
- Avoid Over-Saturation: If you add too much liquid, the colors will blend into a single purple shade rather than maintaining the distinct pink and blue marbled swirl.
- Compression is Key: Pressing the cotton balls firmly against the glass ensures the “fibrous” texture is visible and prevents the light source from being blocked by loose clumps.
- Glitter Layering: Don’t just put glitter at the top. Layering it throughout the jar ensures that the “tiny stars” effect is visible from every angle.
- Light Placement: For the best glow, try to keep the LED light centered. This allows the radiance to push outward through the layers of pink and blue cotton.
Maintenance and Longevity of Your Glow Jars
Because these jars contain moisture and organic cotton, they are best kept in a cool, dry place out of direct sunlight to prevent fading. If you notice the cotton drying out over several months, you can carefully open the lid and add 5ml (1 tsp) of distilled water. Always ensure the silver lid is tightened to maintain the “damp” aesthetic.
Perfect Pairings for a DIY Night
Making DIY Cotton Candy Glow Jars is a fantastic group activity. If you’re hosting a crafting party, you’ll want some crowd-pleasing snacks to keep the energy up. While your jars are setting, serve some spicy jalapeño poppers or a tray of bang-bang chicken tenders. For those who prefer something sweet to match the “Cotton Candy” theme, these moist pineapple bread slices are a tropical delight. If you’re looking for a more savory “appetizer” vibe, try these blueberry brie jalapeño poppers for a unique flavor profile.
Frequently Asked Questions
Yes, provided you use cool-running LED lights (battery operated). Do not use traditional bulbs that emit heat, as the jar contains cotton and moisture.
No, real cotton candy is made of sugar and will dissolve instantly when it touches liquid, resulting in a sticky mess rather than a fibrous jar.
If sealed tightly, they can maintain their damp texture for several months. Keep them out of direct sunlight to prevent the colors from fading.
Liquid food coloring or liquid acrylic pigments work best as they saturate the cotton fibers evenly to create the marbled effect.
This happens when the pink and blue liquids mix too much. To prevent this, ensure the cotton is compressed and avoid adding too much water.
The Ultimate DIY Cotton Candy Glow Jars Recipe

DIY Cotton Candy Glow Jars: Create a Radiant Marbled Masterpiece
Ingredients
Equipment
Method
- Mix 120ml (1/2 cup) water with pink dye and another 120ml with blue dye in separate bowls.
- Turn on the LED light and place it at the bottom of the glass mason jar. Pack cotton balls tightly around it.
- Pour small amounts of pink and blue liquid over the cotton in alternating layers, adding silver glitter between layers.
- Compress the cotton with a skewer to create the marbled effect and seal with the silver metal lid.
Notes
Ensure the lid is airtight to maintain the damp cotton texture.

Closing & Call to Action
These DIY Cotton Candy Glow Jars are more than just a craft; they are a luminous piece of art that brings a soft, calming energy to any room. The combination of neon pink, pastel blue, and shimmering glitter creates a visual experience that is hard to look away from. If you enjoyed making these, please leave a comment below and share your results! Don’t forget to follow us and pin this project to your favorite boards on Pinterest.


