There is nothing quite like the aroma of freshly griddled Homemade English Muffins wafting through a sun-drenched kitchen. If you have only ever experienced the store-bought variety, you are in for a transformative culinary awakening. These aren’t just bread; they are a structural masterpiece designed specifically to cradle pools of melted butter within a pale, airy interior. This recipe focuses on achieving that iconic, porous crumb and a signature toasted golden-brown exterior that makes every bite a textural adventure.
Imagine a stack of three thick, circular muffins resting on a rustic wooden bread board. As you fork-split the top muffin, it reveals a landscape of deep nooks and crannies, ready to be slathered in your favorite toppings. The contrast between the charred, cornmeal-dusted crust and the soft, cloud-like center is exactly what makes the Homemade English Muffins experience so superior. Whether it’s a slow Sunday morning or a fancy holiday brunch, these muffins are the gold standard of breakfast craft.
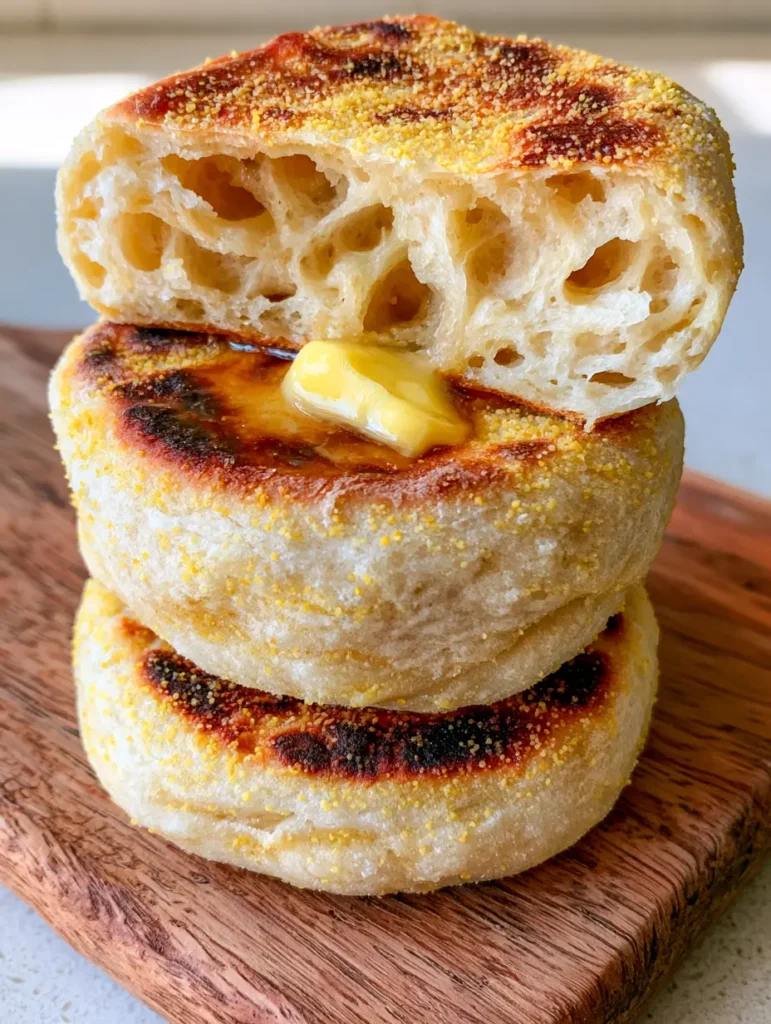
Why These Homemade English Muffins Outshine Every Store-Bought Brand
- The Iconic Crumb: By using a high-hydration dough and a specific fermentation period, we create the massive “nooks and crannies” that store brands simply cannot replicate.
- Superior Toasting Surface: The flat, charred top and bottom surfaces provide a sturdy, crunchy base that stands up to heavy toppings without becoming soggy.
- Artisanal Texture: A generous dusting of fine yellow cornmeal adds a professional “ball-bearing” crunch to the exterior while preventing the dough from sticking to your griddle.
- Preservative-Free Flavor: Without the chemical tang of commercial preservatives, the natural sweetness of the flour and the depth of the yeast take center stage.
Essential Ingredients for the Most Porous Airy Interior
To achieve the visual and structural results of a professional bakery, we need a specific blend of moisture-retaining and structure-building ingredients. Here is what you will need for your Homemade English Muffins.
All-Purpose Flour: 3 ½ cups (438g)
All-purpose flour provides the perfect balance of protein to create a soft crumb while maintaining enough strength to hold those large air bubbles. Using bread flour is an option, but it may result in a chewier, less tender muffin.
Whole Milk: 1 cup (240ml)
Full-fat milk is essential for a rich flavor and a tender, pale interior. The sugars in the milk also help achieve that beautiful golden-brown char on the griddle.
Warm Water: ½ cup (120ml)
Water increases the hydration of the dough, which is the secret to creating steam-filled pockets (nooks) during the cooking process. Ensure it is between 105°F and 115°F (40°C-46°C) to activate the yeast without killing it.
Unsalted Butter: 2 tbsp (28g), melted and cooled
Butter provides the “shortness” to the dough, ensuring the muffins are easy to pull apart and have a luxurious mouthfeel. You will also need extra salted butter for that glistening liquid pool in the center after toasting.
Honey or Granulated Sugar: 1 tbsp (15g)
A small amount of sweetener feeds the yeast, accelerating fermentation and contributing to the deep browning of the exterior surfaces.
Active Dry Yeast: 1 packet (2 ¼ tsp / 7g)
This is the engine of our recipe, responsible for the rise and the distinctive yeasty aroma. Ensure your yeast is fresh for the best “puffy” results.
Fine Sea Salt: 1 tsp (6g)
Salt is the “invisible” essential that controls yeast activity and tightens the gluten structure, preventing the muffins from collapsing.
Yellow Cornmeal: ½ cup (60g), for dusting
Yellow cornmeal is non-negotiable for the authentic look and feel. It prevents the wet dough from sticking and creates that gritty, toasted texture on the bottom.
The Tools Required for a Professional Bakery Result
To achieve the handheld smartphone photo look—with that perfect stack and charred surface—you need a few specific kitchen tools. The right equipment ensures even heat distribution and a clean shape.
A heavy-bottomed cast iron skillet or a flat electric griddle is the best choice for cooking Homemade English Muffins. Cast iron retains heat exceptionally well, allowing you to sear the exterior to a deep golden-brown while the interior steams to perfection. If you have a flat-top griddle, you can cook the entire batch at once, ensuring consistent coloring across all muffins.
You will also need a wooden bread board for that rustic presentation. For shaping, a 3-inch (7.5cm) circular biscuit cutter or even empty, cleaned tuna cans can help maintain a uniform, round shape. Finally, a bench scraper is incredibly helpful for handling the high-hydration, slightly sticky dough without adding too much extra flour.

The Secret Step-by-Step for Fork-Split Perfection
Phase 1: Hydrating the Dough and First Rise
In a large mixing bowl, combine the warm milk, warm water, honey, and yeast. Let this sit for about 5-10 minutes until a foamy “cap” forms on the surface, indicating the yeast is active. This sensory cue is vital; if it doesn’t foam, your muffins won’t have those airy crannies.
Add the melted butter and whisk gently. Gradually stir in the flour and salt using a sturdy wooden spoon. The dough will be much wetter and stickier than a traditional loaf of bread—this is intentional. A wet dough creates more steam, which is the “magic” behind the porous crumb. Cover the bowl with a damp cloth and let it rise in a warm, draft-free spot for 60-90 minutes, or until it has doubled in size and looks bubbly.
Phase 2: Shaping and the Cornmeal Dusting
Prepare a large baking sheet by generously dusting it with half of the yellow cornmeal. Gently turn the risen dough onto a lightly floured surface. Do not “punch down” the dough aggressively; we want to preserve as many air bubbles as possible. Pat the dough out to about 1-inch (2.5cm) thickness.
Use your circular cutter to press out rounds, moving straight down and up without twisting. Place each round onto the cornmeal-dusted baking sheet. Sprinkle the tops with the remaining cornmeal. Cover them lightly and let them rest for another 20-30 minutes. They should look noticeably puffy and delicate to the touch.
Phase 3: Griddle Baking for the Perfect Char
Heat your skillet or griddle over low-medium heat. Do not use high heat, or the outside will burn before the inside is cooked through. You shouldn’t need oil if using well-seasoned cast iron, but a light wipe of neutral oil can help if you’re worried about sticking.
Carefully transfer the muffins to the skillet. Cook for 7-9 minutes per side. You are looking for a specific visual change: a deep, charred golden-brown surface and a slight “springiness” when touched. The cornmeal will smell toasted and nutty. If the muffins are browning too fast, lower the heat immediately.
Phase 4: The Cool and the “Fork-Split”
This is the most important step for Homemade English Muffins: let them cool completely on a wire rack. If you cut into them while hot, the steam will escape too quickly, and the interior will turn gummy. Once cool, never use a knife to slice them. Instead, use a fork to poke holes all the way around the equator of the muffin, then gently pull it apart. This preserves the “nooks and crannies” that catch the melting butter.
Pro-Tips for Mastering the Griddle
- Temperature Control: If your muffins are doughy in the middle but dark on the outside, your heat is too high. Aim for a “low and slow” approach to allow the center to set.
- The “Lid” Trick: If you find the centers aren’t cooking fast enough, place a large lid or a second baking sheet over the skillet for the first 4 minutes of cooking to trap steam.
- High Hydration handling: If the dough is too sticky to handle, wet your hands with a little water or oil rather than adding more flour. More flour equals a denser muffin.
- The Fork-Split Rule: Always, always fork-split. Using a knife smoothes over the texture, destroying the very pockets we worked so hard to create.
Keeping Your Muffins Fresh and Toast-Ready
Because these Homemade English Muffins contain no preservatives, they are best enjoyed within 48 hours. Store them in an airtight container or a zip-top bag at room temperature. For longer storage, these muffins freeze beautifully. Slice them (using the fork method!) before freezing so you can pop a frozen half directly into the toaster.
To reheat, toast the split muffins until the edges are crispy and the center is warm. This brings back the “charred” aroma and creates the perfect environment for a pat of salted butter to melt into a glistening liquid pool.
Creative Ways to Enjoy Your Fresh Muffins
While a simple slab of butter is divine, these Homemade English Muffins are incredibly versatile. For a savory twist, try topping them with garlic-infused cowboy butter (coming soon) and a poached egg. They also make a fantastic base for a breakfast sandwich alongside some crispy onion rings if you’re feeling adventurous with your brunch pairings.
If you’re planning a full spread, these muffins pair beautifully with a light chickpea and black bean salad (coming soon) for a balanced lunch. They are also a staple for easy vacation meal planning, as the dough can be made the night before and cooked fresh in the morning with minimal effort.
Frequently Asked Questions
English muffins are traditionally griddle-baked to get that signature flat, charred surface. While you can bake them, they will come out more like dinner rolls without that specific toasted texture.
While muffin rings help create perfectly uniform circles, they aren’t strictly necessary. You can shape the dough by hand or use a circular biscuit cutter for a more rustic, organic look.
Because they lack preservatives, they stay fresh at room temperature for about 2 days. For longer storage, slice and freeze them for up to 3 months.
Yellow cornmeal acts as a non-stick barrier for the wet dough and provides the classic ‘gritty’ artisanal crunch and visual appeal associated with authentic English muffins.
This is usually caused by two things: either the dough was too dry (low hydration) or you used a knife to slice them. Always use a high-hydration dough and split them with a fork to preserve the air pockets.
The Ultimate Homemade English Muffins Recipe

Homemade English Muffins: The Ultimate Guide to Perfect Nooks and Crannies
Ingredients
Equipment
Method
- Combine warm milk, water, honey, and yeast in a bowl. Let sit for 5-10 minutes until foamy.
- Stir in melted butter, flour, and salt. The dough will be sticky. Cover and rise for 90 minutes until doubled.
- Turn dough onto a floured surface. Pat to 1-inch thick and cut with a 3-inch circular cutter.
- Place rounds on a baking sheet dusted with yellow cornmeal. Dust tops with more cornmeal. Rest for 20 minutes.
- Heat a skillet over low-medium. Cook muffins for 7-9 minutes per side until charred golden-brown and springy.
- Cool completely on a rack. Use a fork to split open and reveal the airy interior with deep nooks and crannies.
Notes
Ensure the griddle heat is low to prevent the exterior from burning before the center is set.

Closing & Call to Action
Mastering Homemade English Muffins is a badge of honor for any home baker. The satisfaction of pulling apart a warm muffin to reveal those deep, buttery pockets is unmatched by anything you’ll find in a grocery store aisle. We hope this guide helps you achieve that perfect golden-brown char and airy interior every single time. If you enjoyed this recipe, please leave a comment below and share your results! Don’t forget to pin this recipe to your breakfast boards on Pinterest for later.


