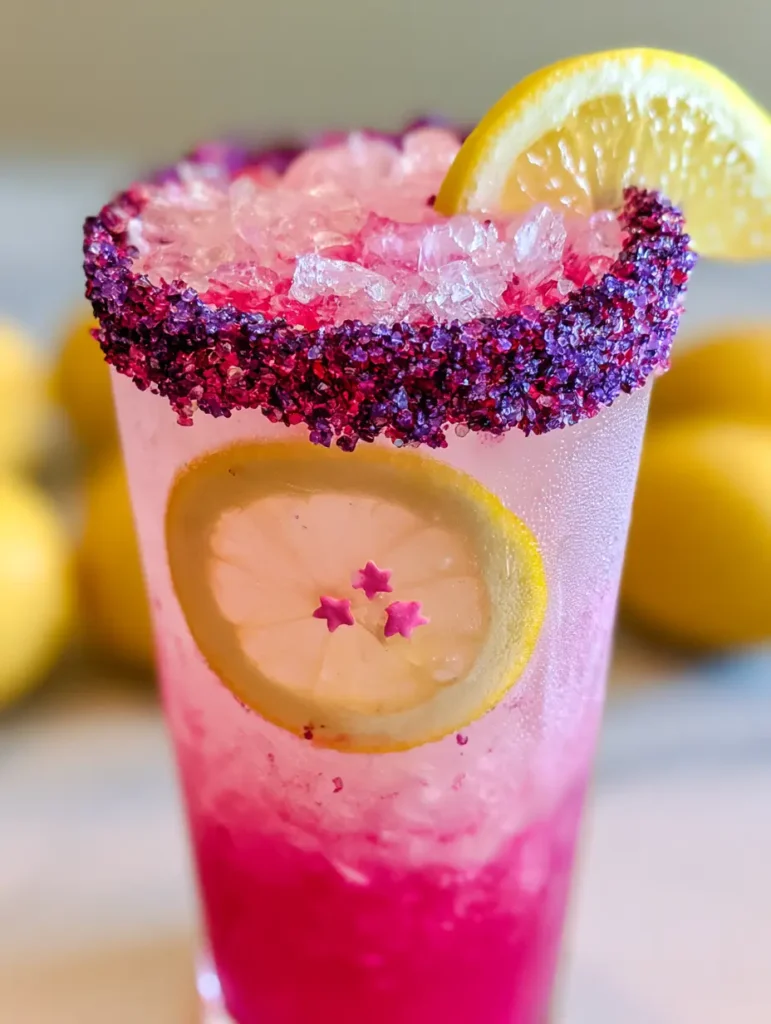
There is something inherently joyful about a beverage that looks like it was plucked straight from a fairy tale. This Unicorn Lemonade isn’t just a drink; it is a multisensory experience that combines the sharp, zesty brightness of citrus with a visually stunning magenta-to-pale-pink gradient.
When you hold a glass of this vibrant refreshment, you’ll immediately notice the jagged crushed ice catching the light and the thick, sparkling crust of purple and magenta sanding sugar on the rim. It is the ultimate showstopper for summer parties, whimsical birthdays, or simply a Tuesday afternoon that needs a bit of magic.
Inspired by the “handheld smartphone photo” aesthetic of modern food trends, this recipe focuses on saturated colors and natural condensation. We are moving beyond basic food coloring to create a professional-grade layered drink that tastes as good as it looks.
Why This Shimmering Sip Is a Total Game Changer
- Saturated Visual Appeal: The bottom third of the glass features a deep, saturated magenta syrup that creates a breathtaking ombre effect as it bleeds into the pale lemonade.
- Texture Contrast: From the crunch of the jagged ice to the granular sparkle of the dual-toned sanding sugar rim, every sip offers a unique mouthfeel.
- Natural Vibrancy: By using specific fruit-based infusions, we achieve that “unicorn” glow without the artificial aftertaste of heavy dyes.
- Photo-Ready Garnish: The thin yellow lemon slice tucked against the glass wall, complete with a tiny pink star-shaped sprinkle, provides a professional finishing touch.
The Secret Science of Saturated Magenta Syrup
To achieve the visual recipe blueprint’s “saturated magenta” look, we rely on the density of a homemade simple syrup. This syrup is heavier than the lemonade, allowing it to sit at the bottom of the glass for that iconic layered look.
1 cup (200g) Granulated Sugar: This provides the structural weight necessary for layering. It creates the “syrup” consistency that prevents the colors from mixing instantly.
1 cup (240ml) Water: The base for our infusion, ensuring the sugar dissolves completely into a clear, viscous liquid.
2 tbsp (12g) Pink Pitaya Powder or 1/2 cup (75g) Fresh Dragon Fruit: This is the culinary “secret weapon” for that specific magenta hue. Pitaya is naturally neon and provides a tropical undertone that complements lemon perfectly.
Essential Ingredients for Your Pastel Masterpiece
1 cup (240ml) Freshly Squeezed Lemon Juice: Approximately 5-6 large lemons. Fresh juice is non-negotiable for the “translucent pale pink” clarity described in the prompt.
3 cups (720ml) Cold Filtered Water: This will be mixed with a portion of the magenta syrup to create the “translucent pale pink lemonade” layer.
2 cups (approx. 300g) Jagged Crushed Ice: Not standard cubes, but rough-hewn shards that create more surface area for the syrup to “bleed” against.
2 tbsp (25g) Purple Sanding Sugar & 2 tbsp (25g) Magenta Sanding Sugar: These will be blended to create the “thick, sparkling crust” on the rim of the glass.
2 Fresh Yellow Lemons: One for thin, circular slices to tuck inside the glass and another for half-moon wedges to perch on the rim.
1 tsp (5g) Pink Star-Shaped Sprinkles: These tiny details are what bridge the gap between a standard drink and a “unicorn” creation.
Tools of the Trade for Crushing and Layering
A heavy-duty blender or an ice mallet and Lewis bag is required to achieve the “jagged” ice texture. Smooth, round ice cubes will not hold the syrup in the same way, losing that “bleeding” visual effect.
You will also need a wide, shallow dish for rimming the glasses and a long-handled bar spoon. The spoon is critical for the “slow pour” technique, which ensures the lemonade sits gently on top of the dense magenta base.
High-quality tall clear glasses are essential. Since the Midjourney prompt specifies “light condensation” and a “vessel” showing the layers, choose thin-walled glass that allows the temperature differential to create that beautiful misty exterior.

Mastering the Art of the Dual-Toned Sugar Rim
The first step in our visual journey is the rim. Mix your purple and magenta sanding sugars in a shallow bowl until the colors are marbled but not entirely blended into a single shade.
Run a lemon wedge around the entire rim of your tall glass, ensuring the glass is moistened about 1/4 inch (6mm) down the sides. This moisture acts as the “glue” for our sparkling crust.
Dip the glass into the sugar mixture with a slight twisting motion. Press firmly so the sugar forms a “heavily coated” layer. Set the glass aside for 2 minutes to allow the sugar to “set” before adding liquids.
Crafting the Perfect Ombre Gradient
Step 1: The Magenta Foundation
In a small saucepan, combine the sugar, water, and pitaya. Simmer over medium heat for 5 minutes until the sugar is dissolved and the liquid is a deep, saturated magenta. Let it cool completely; a warm syrup will mix too quickly with the lemonade.
Step 2: Preparing the Pale Pink Lemonade
In a separate pitcher, whisk together the fresh lemon juice and cold water. To achieve the “translucent pale pink” color, stir in exactly 1 tablespoon (15ml) of your cooled magenta syrup. It should look like a delicate rose quartz.
Step 3: The Jagged Ice Fill
Fill your sugar-rimmed glass to the very top with the jagged crushed ice. The ice acts as a buffer, breaking the fall of the liquid and helping to maintain the distinct layers.
Step 4: The Layered Pour
Pour 1/4 cup (60ml) of the concentrated magenta syrup into the bottom of the glass. It will settle among the ice shards at the bottom third. Next, hold a bar spoon just above the ice and slowly pour the pale pink lemonade over the back of the spoon.
Garnishing with Precision: The Lemon Star Method
Before the lemonade reaches the top, take a thin circular lemon slice. Use a pair of kitchen tweezers to place one pink star-shaped sprinkle exactly in the center of the lemon slice. Carefully slide this slice down the inside wall of the glass so it is pinned against the glass by the ice.
Top off the drink with more lemonade until it reaches the sugar rim. Finally, take a half-moon lemon slice and perch it on the rim. As the drink sits for a moment in the “soft natural daylight,” you will see the magenta syrup “softly bleed” upward, creating the perfect ombre look.
If you are serving this alongside a full spread, it pairs beautifully with honey garlic chicken skewers for a savory-sweet balance or even strawberry cheesecake wonton bites (coming soon) for a themed dessert party.
Expert Tips for Success
- Chill Your Glassware: Place your glasses in the freezer for 10 minutes before rimming. This helps create the “light condensation” visual cue almost instantly once the ice is added.
- Density is Key: If your layers are mixing too fast, your syrup might be too thin. Simmer it for another 2-3 minutes to increase the sugar concentration.
- The “Bleed” Control: To get that “softly bleeding” effect, do not stir the drink! Let the natural kinetic energy of the pour create the movement.
- Sprinkle Placement: Dampen the back of the star sprinkle with a tiny drop of syrup to help it stick to the lemon slice before you slide it into the glass.
Storage and Make-Ahead Magic
You can prepare the magenta syrup up to two weeks in advance. Store it in a glass jar in the refrigerator. The lemonade base can be made 24 hours in advance, but do not combine them until the moment of serving.
This recipe does not freeze well as a finished drink because the layers will merge. However, you can freeze the magenta syrup in ice cube trays to use as “color bombs” for future drinks! This is a great trick for easy vacation meals where you want a fancy drink with minimal effort.
Perfect Pairings for a Summer Soiree
Because this Unicorn Lemonade is quite sweet and acidic, it works best with salty or savory-umami dishes. For a light lunch, try it with a chickpea and black bean salad (coming soon).
For a whimsical evening, serve it as the “signature drink” alongside glow jars (coming soon) for an outdoor garden party. The neon magenta glow of the drink looks incredible under the soft ambient light of the jars.
Common Questions About This Viral Refreshment
You can use a monk fruit or erythritol simple syrup, but keep in mind that the density will change, which may make layering more difficult.
The secret is density and temperature. Ensure your magenta syrup is cold and has a high sugar concentration, then pour the lemonade slowly over a bar spoon to buffer the flow.
We use pink pitaya (dragon fruit) powder or fresh dragon fruit. It provides a naturally vibrant, neon magenta hue that is much more saturated than standard food coloring.
Jagged ice refers to irregular shards rather than uniform cubes. It creates more surface area to catch the syrup, resulting in a better ‘bleeding’ ombre effect.
These are commonly found in the baking aisle of craft stores or online specialty cake decorating shops. They are the key to the ‘unicorn’ aesthetic.
The Ultimate Unicorn Lemonade Recipe
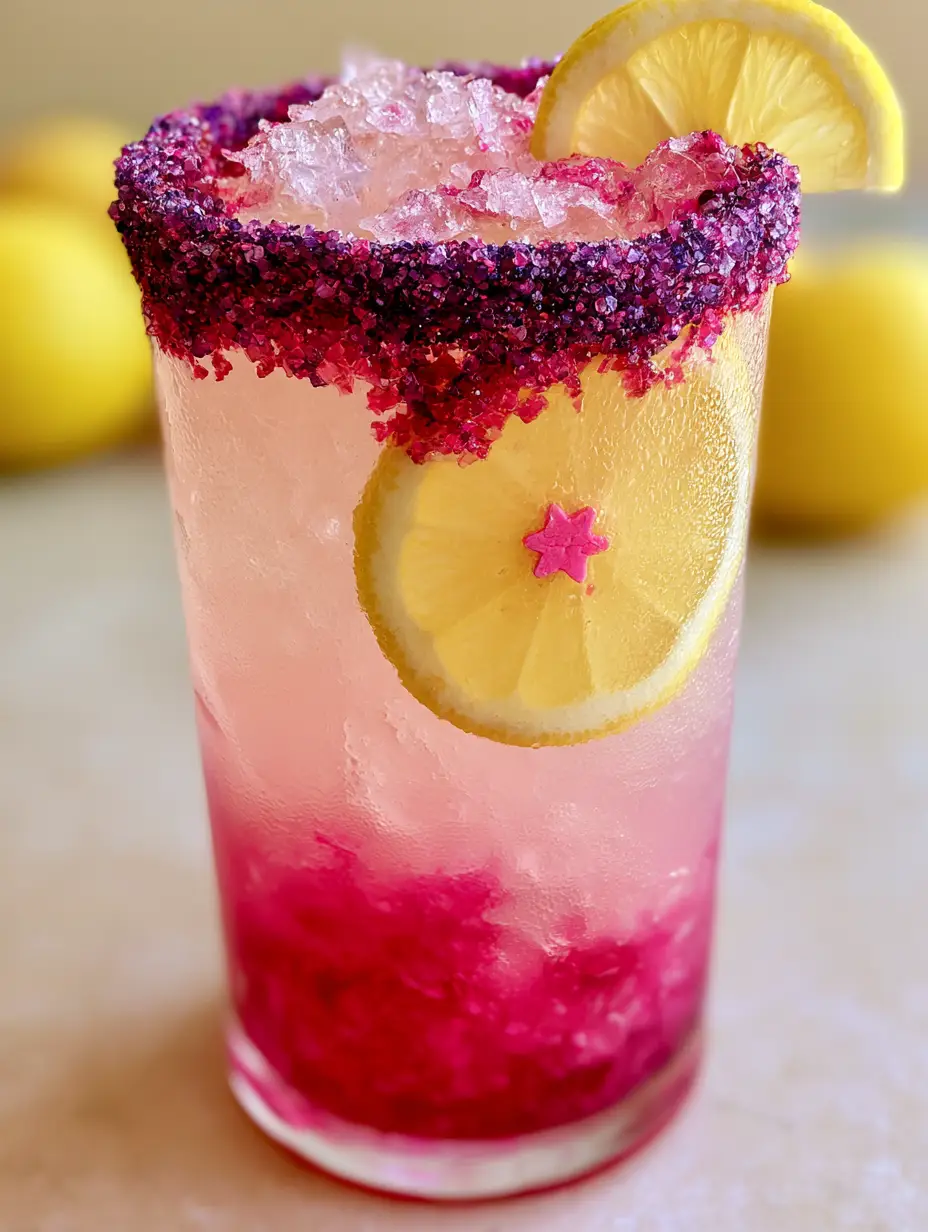
Unicorn Lemonade: A Magical Layered Ombre Drink Recipe
Ingredients
Equipment
Method
- Combine sugar, 1 cup water, and pitaya powder in a saucepan. Simmer for 5 minutes until fully dissolved. Cool completely.
- Mix purple and magenta sugars in a bowl. Rub a lemon wedge on the glass rim and dip into the sugar to create a thick crust.
- Fill the glass with jagged crushed ice. Pour 1/4 cup of the magenta syrup into the bottom. Mix lemon juice and 3 cups water with 1 tbsp of syrup to create the pale pink lemonade.
- Slowly pour the pale pink lemonade over a bar spoon into the glass. Slide a lemon slice with a pink star sprinkle against the inner glass wall. Garnish with a lemon half-moon.
Notes
Use a bar spoon to break the pour and prevent immediate mixing.
Closing & Call to Action
This Unicorn Lemonade is more than just a refreshing citrus drink; it’s a masterpiece of color and texture that proves we can eat (and drink) with our eyes first. Whether you’re making this for a magical birthday or a sunny patio afternoon, the saturated magenta layers and sparkling sugar rim are sure to impress.
If you loved this recipe, please leave a comment below and let us know how your ombre layers turned out! Don’t forget to share your creations and follow us on Pinterest for more visually stunning recipes and culinary inspiration.


