There is a fundamental difference between a basic piece of protein and a masterpiece of backyard grilling. This Grilled Chicken Marinade is the bridge between those two worlds, designed specifically to deliver that elusive combination of a moist, glistening white interior and a translucent golden-brown glaze that rivals any high-end steakhouse. If you have ever struggled with dry chicken or dull, lackluster skin, you are in the right place to master the culinary science of the perfect sear.
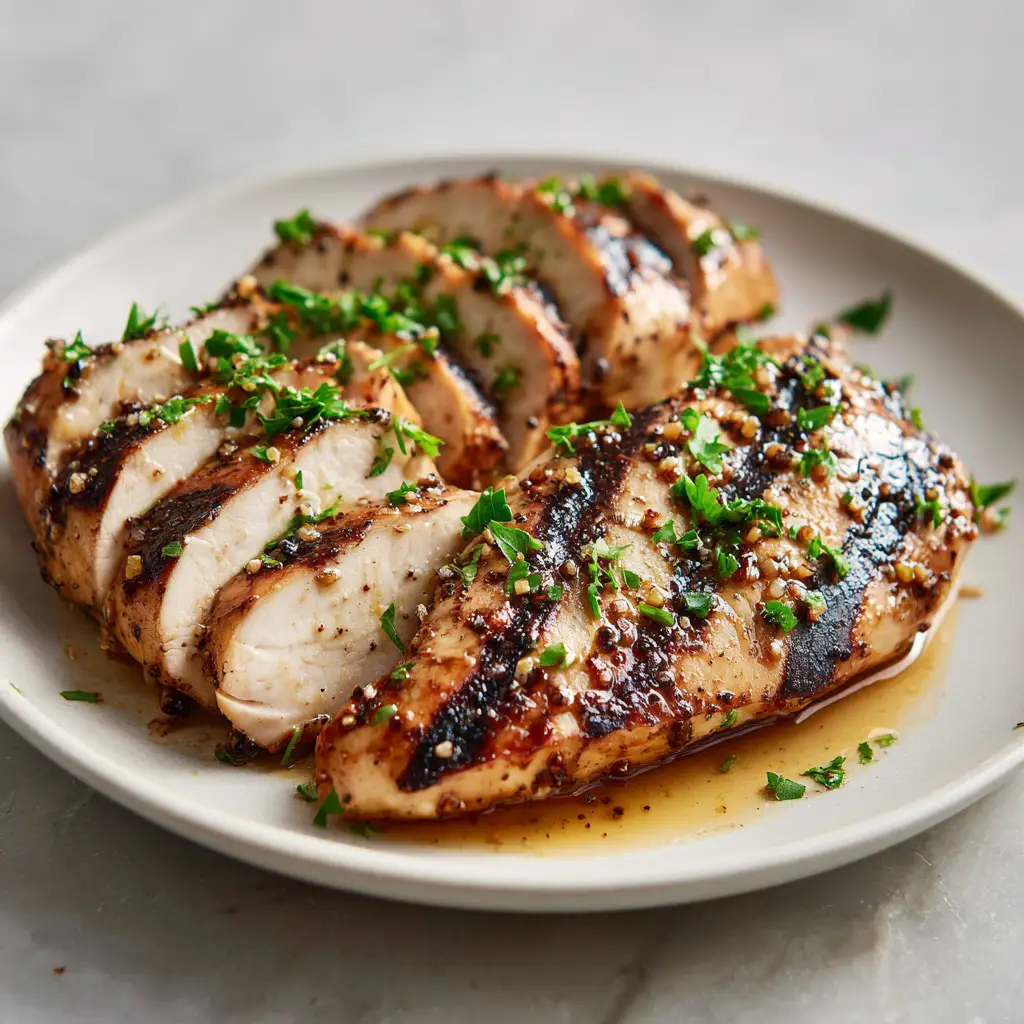
Imagine pulling a perfectly cooked breast off the grates. The surface is adorned with dark, defined diagonal char marks that provide a smoky depth. The exterior is coated in a thin, glossy glaze that catches the natural daylight, while a shower of finely chopped fresh parsley and cracked black pepper adds the final touch of vibrant color and pungent heat. This recipe isn’t just about flavor; it is about creating a visual and sensory experience that begins the moment the meat hits the heat.
Why This Is the Only Chicken Marinade You Will Ever Need
- Visual Perfection: This recipe is engineered to produce those iconic diagonal char marks and a glossy, golden-brown finish that looks stunning on a simple white ceramic plate.
- Textural Balance: We focus on a high-moisture interior, ensuring the chicken remains succulent and tender even after it has been sliced.
- Aromatic Depth: The inclusion of fresh parsley and coarse-cracked black pepper provides a sophisticated flavor profile that pairs perfectly with hearty sides like Mediterranean rice and beans.
- Chemical Efficacy: The ratio of acid to fat to sugar is scientifically balanced to tenderize the muscle fibers without turning them into mush.
The Anatomy of a High-Performance Grilled Chicken Marinade
To achieve the visual result described in our blueprint, every ingredient must serve a specific structural and culinary purpose. We aren’t just adding liquid; we are building a multi-layered coating that will transform under the intense heat of the grill.
Extra Virgin Olive Oil (1/2 cup / 120ml): Oil is the primary conductor of heat and the base of our glossy glaze. It prevents the chicken from sticking to the grates, ensuring those diagonal char marks remain sharp and defined rather than torn.
Fresh Lemon Juice (3 tbsp / 45ml): The citric acid acts as a gentle tenderizer, breaking down the tough surface proteins. This allows the other flavors to penetrate deeper while providing a bright, acidic counterpoint to the rich oil.
Honey or Brown Sugar (2 tbsp / 30g): This is the “secret sauce” for the glaze. The sugars undergo the Maillard reaction, creating that translucent golden-brown exterior and helping the marinade cling to the meat as it reduces over the flames.
Dijon Mustard (1 tbsp / 15g): Mustard acts as a natural emulsifier, binding the oil and acid together into a thick, cohesive liquid. This ensures the chicken is evenly coated and the glaze doesn’t simply drip off into the coals.
Garlic Powder (1 tsp / 5g): While fresh garlic is great, powder provides a more uniform flavor distribution and won’t burn as easily during the high-heat searing process required for those dark char marks.
Kosher Salt (1 tsp / 6g): Salt is non-negotiable for moisture retention. It draws the marinade into the cells of the chicken through osmosis, ensuring a “moist glistening white interior” every single time.
Freshly Cracked Black Pepper (1/2 tsp / 2g): We use coarse grains to provide visual texture. These tiny black specks will be visible on the finished dish, offering a sharp contrast against the golden glaze.
Fresh Italian Parsley (2 tbsp / 8g, finely chopped): This is our visual “pop.” Adding it at the very end preserves its bright green color and fresh, herbaceous aroma, cutting through the smoky charred notes of the grill.
Essential Tools for Achieving the Perfect Char
You cannot achieve professional-grade results without the right equipment. To get those “defined diagonal char marks,” you need a cooking surface that can retain and distribute high levels of radiant heat.
A heavy-duty cast iron grill or a well-maintained outdoor gas grill is the gold standard. You will also need a pair of long-handled tongs to rotate the chicken precisely 45 degrees for the cross-hatch pattern. A digital meat thermometer is also critical; it is the only way to ensure that “moist interior” without overcooking the meat into a dry, fibrous state. If you are cooking indoors, a ridged cast iron grill pan is your best friend for mimicking the outdoor experience.
How to Prep Your Chicken for Maximum Glaze Adhesion
Before the chicken even touches the Grilled Chicken Marinade, you must prepare the surface. Start by patting the chicken breasts dry with paper towels. Removing excess surface moisture ensures that the marinade sticks to the protein rather than sliding off, which is essential for that “thin, translucent golden-brown glaze.”
If your chicken breasts are of uneven thickness, use a meat mallet to pound the thicker ends slightly. This creates a uniform thickness, which is the key to even cooking times. When every part of the breast finishes at the same time, you avoid the common pitfall of having one end dry and stringy while the other is barely cooked. This uniform surface also makes it much easier to achieve consistent char marks across the entire piece of meat.

Step-by-Step Instructions for the Ultimate Grilled Chicken
Phase 1: Emulsifying the Marinade
In a medium glass bowl, whisk together the olive oil, lemon juice, honey, and Dijon mustard. Whisk vigorously until the mixture is thick and no longer separating. Once emulsified, stir in the garlic powder, salt, and half of the cracked black pepper. This creates the base for that glossy finish we saw in the visual blueprint.
Phase 2: The Marinating Window
Place your prepared chicken breasts into a large resealable bag and pour in the marinade. Massage the bag to ensure every inch of the meat is coated. Refrigerate for at least 30 minutes, but no more than 4 hours. Because of the lemon juice, marinating too long will actually start to “cook” the chicken, resulting in a mealy texture that ruins the glistening interior we are aiming for.
Phase 3: Preheating for Performance
Clean your grill grates thoroughly and lightly oil them. Preheat your grill to medium-high heat (about 400°F / 200°C). You want the grates to be hot enough that the chicken hisses immediately upon contact. This high initial heat is what creates the dark, defined char marks without overcooking the center.
Phase 4: Searing and Rotating
Place the chicken breasts on the grill at a 45-degree angle to the grates. Close the lid and let them sear undisturbed for 3-4 minutes. You will know they are ready to move when they release easily from the grates. For those professional diagonal marks, lift the chicken and rotate it 45 degrees in the opposite direction, then sear for another 3 minutes.
Phase 5: The Final Glaze and Rest
Flip the chicken and continue cooking until the internal temperature reaches 160°F (71°C). During the last 2 minutes of cooking, brush any remaining (boiled/safe) marinade or a bit of extra honey over the top to enhance that golden-brown glaze. Remove the chicken from the heat and let it rest on a warm plate for at least 5 minutes. The temperature will carry over to a perfect 165°F (74°C), and the juices will redistribute, ensuring that moist, glistening interior.
Pro-Tips for an Elite Grilling Experience
- The 45-Degree Rule: For the most photogenic results, always place your meat at an angle. Never place it parallel to the grates if you want that “handheld smartphone photo” aesthetic.
- Sugar Management: If your glaze is darkening too quickly, move the chicken to a cooler part of the grill (indirect heat) to finish cooking. This prevents the honey from burning into a bitter black crust.
- The Freshness Factor: Always use freshly cracked pepper. Pre-ground pepper loses its volatile oils quickly, but freshly cracked grains provide that “tiny cracked black pepper grain” visual and a much more potent flavor.
- Resting is Vital: Never slice the chicken immediately. If you do, the glistening moisture will run out onto the plate, leaving the meat dry. Resting allows the protein fibers to relax and hold onto those delicious juices.
Mastering the Art of Plating and Serving
To replicate the visual blueprint, slice the grilled chicken breast on a slight bias (diagonal). This showcases the moist white interior against the dark, charred exterior. Arrange the slices on a simple white ceramic plate. The white background makes the golden-brown glaze and the green parsley pop with high-contrast clarity.
Sprinkle the finely chopped fresh parsley and the remaining cracked black pepper over the top just before serving. The heat from the chicken will slightly wilt the parsley, releasing its aroma without losing its color. For a complete meal, serve this alongside air fryer zucchini bites or a hearty Italian grinder tortellini salad. If you want to add a rich, buttery finish, a dollop of cowboy butter on top of the hot chicken creates an incredible pan-sauce effect.
Storage, Reheating, and Meal Prep
This Grilled Chicken Marinade makes for excellent leftovers. Store the cooked chicken in an airtight container in the refrigerator for up to 4 days. To maintain that “glistening” texture when reheating, use a damp paper towel over the meat in the microwave, or better yet, reheat it gently in a skillet with a splash of chicken broth or water.
You can also freeze the raw chicken inside the marinade bag. It will marinate as it thaws in the fridge, making it a perfect option for busy weeknights. Just ensure you use it within 3 months for the best flavor and texture quality.
Frequently Asked Questions
Ensure your grill is preheated to 400°F (200°C). Place the chicken at a 45-degree angle, sear for 4 minutes, then rotate 45 degrees in the opposite direction for the cross-hatch effect.
For chicken breasts, 30 minutes to 4 hours is ideal. Any longer and the acidity in the lemon juice can break down the proteins too much, resulting in a mealy texture.
Only if you boil the used marinade for at least 5 minutes to kill any bacteria from the raw meat. Alternatively, set aside a portion of the marinade before adding the chicken to use for basting.
The key is internal temperature and resting. Pull the chicken off the grill at 160°F (71°C) and let it rest for 5 minutes. The carry-over heat will bring it to 165°F (74°C) while keeping the juices inside.
Glossiness comes from the emulsification of oil and sugars. Ensure you whisk the Dijon and honey thoroughly with the oil, and brush a final layer on during the last 2 minutes of grilling.
The Ultimate Grilled Chicken Marinade Recipe Card
Grilled Chicken Marinade: The Secret to Juicy, Glossy, Restaurant-Style Results
Ingredients
Equipment
Method
- In a medium bowl, whisk together the olive oil (120ml), lemon juice (45ml), honey (30g), and Dijon mustard (15g) until fully emulsified and thickened. Stir in garlic powder, salt, and half the black pepper.
- Place chicken in a resealable bag with the marinade. Refrigerate for 30 minutes to 4 hours, ensuring every surface is coated for that glossy glaze.
- Clean and oil your grill grates. Preheat to medium-high (400°F / 200°C) to ensure immediate searing upon contact.
- Place chicken at a 45-degree angle. Sear for 4 minutes. Rotate 45 degrees in the opposite direction and sear for another 3-4 minutes to create defined diagonal char marks.
- Flip chicken and cook until internal temp hits 160°F (71°C). Brush with extra marinade/honey for a glistening finish. Let rest on a plate for 5 minutes before slicing on a bias.
- Sprinkle with finely chopped fresh parsley and the remaining cracked black pepper grains before serving on a white ceramic plate.
Notes
Always rest the meat for 5 minutes to ensure the interior remains moist and glistening.
Join the Crisp Crumbs Community!
We hope this Grilled Chicken Marinade becomes a staple in your summer grilling rotation. There is nothing quite like the satisfaction of achieving that perfect, glossy finish and juicy interior at home. If you enjoyed this recipe, please leave a comment below and let us know how your char marks turned out!
Don’t forget to follow us on Pinterest and share your creations with the hashtag #CrispCrumbs. For more grilling inspiration, check out our grilled pork chop marinade or try these chicken street tacos for your next gathering. Happy grilling!


