The Dubai Chocolate Pistachio Tart is more than just a dessert; it is a cultural phenomenon distilled into a single, breathtaking pastry. Inspired by the decadent, gold-flecked chocolate bars that took the internet by storm, this tart combines the deep, earthy bitterness of a dark cocoa shortcrust with the intense, nutty sweetness of a vibrant lime-green pistachio center. Every bite offers a structural masterpiece of textures, from the sharp snap of the crust to the silky, glossy embrace of a professional-grade dark chocolate ganache.
This recipe isn’t just about following the trend—it’s about mastering the culinary science required to achieve those clean, sharp edges and the perfect “vibrant green” contrast seen in elite food photography. Whether you are looking for a showstopper for your next dinner party or simply want to recreate a piece of edible luxury at home, this guide will walk you through the forensic details of making a world-class tart. After mastering this, you might even want to explore other textured favorites like a peach cobbler with oatmeal crumble for your next baking project.
Prepare yourself for a sensory journey. From the smell of toasted nuts to the visual brilliance of 24-karat gold leaf, this is the definitive way to experience the viral Dubai flavor profile in a sophisticated, handheld form.
Why This Dubai Chocolate Pistachio Tart Works: The Anatomy of Flavor
- Structural Integrity: The dark cocoa shortcrust uses a specific fat-to-flour ratio to ensure a “sharp, straight edge” that doesn’t crumble when sliced.
- Vibrant Color Contrast: By using high-quality pistachio paste and a hint of white chocolate, we achieve that signature dense, lime-green layer that pops against the dark cocoa.
- The Gloss Factor: A touch of glucose or light corn syrup in the dark chocolate ganache ensures a mirror-like finish that reflects light beautifully.
- Textural Harmony: The crunch of raw, crushed pistachios on top provides a necessary counterpoint to the velvet-smooth ganache and the creamy pistachio interior.
- Opulent Finishing: Genuine edible gold leaf flakes provide the “Dubai” signature, making the tart look as expensive as it tastes.
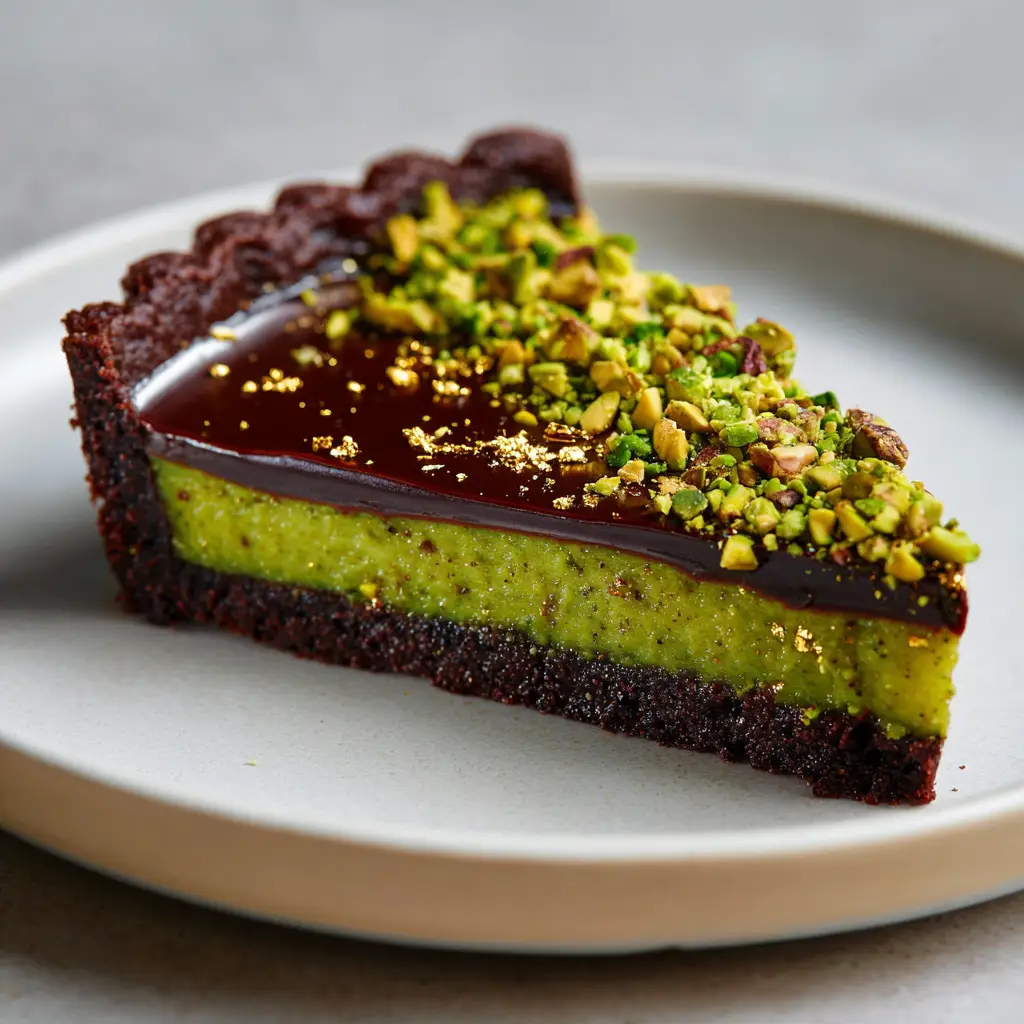
The Essential Components for a Professional-Grade Cocoa Crust
To achieve the “thick, dark cocoa shortcrust pastry base” described in our visual blueprint, we must focus on the science of the pâte sablée. Using Dutch-processed cocoa is non-negotiable here; it provides the deep, nearly black color and a mellow, chocolatey flavor that isn’t overly acidic.
1 ½ cups (190g) All-Purpose Flour: This provides the necessary structure. Ensure you measure by weight for the most accurate results in pastry work.
⅓ cup (35g) Dutch-Process Cocoa Powder: This is what gives the crust its “dark cocoa” identity and signature earthy aroma during the baking process.
½ cup (100g) Granulated Sugar: A small amount of sugar helps with the “snap” of the crust through caramelization while providing just enough sweetness to balance the cocoa.
¾ cup (170g) Unsalted Butter, Cold and Cubed: The butter must be ice-cold to ensure a short, sandy texture rather than a flaky pie-crust texture. This is key for those sharp edges.
1 Large Egg: The egg acts as the primary binder, ensuring the tart shell is sturdy enough to hold the dense pistachio and ganache layers without leaking.
½ tsp (3g) Sea Salt: Salt is a flavor enhancer that cuts through the richness of the chocolate and highlights the nuttiness of the pistachio.
Crafting the Dense, Vibrant Lime-Green Pistachio Filling
The heart of the Dubai Chocolate Pistachio Tart is its center. We are aiming for a “dense, vibrant lime-green pistachio paste layer” that holds its shape when the tart is sliced. If you enjoy the savory-sweet balance of this filling, you might also enjoy our keto crack burgers for a completely different flavor profile that still hits those high-fat, high-satisfaction notes.
1 cup (250g) Pure Pistachio Paste: Look for 100% pistachio paste with no added sugar or oils. This ensures the most “vibrant” color and authentic flavor.
½ cup (85g) White Chocolate Chips, Melted: The white chocolate acts as a setting agent, giving the filling its “dense” consistency while keeping the green color bright.
2 tbsp (30ml) Heavy Cream (35% Fat): A splash of cream helps emulsify the paste and chocolate into a spreadable, silky consistency.
¼ tsp (1g) Almond Extract: While optional, a tiny drop of almond extract acts as a “booster” for the natural pistachio flavor, making it taste even more intense.
The Science of the Perfect Glossy Dark Chocolate Ganache
A “glossy dark chocolate ganache” requires a perfect emulsion of fat and liquid. For the visual results we want—a thick, reflective top layer—we use a 1:1 ratio of chocolate to cream, with a secret ingredient for shine.
1 cup (175g) Dark Chocolate (60-70% Cacao), Finely Chopped: High-quality chocolate is essential. Avoid chocolate chips if possible, as they contain stabilizers that prevent a perfectly smooth melt.
¾ cup (180ml) Heavy Whipping Cream: This provides the liquid base for our emulsion. Do not use milk; the fat content is too low for a stable ganache.
1 tbsp (20g) Light Corn Syrup or Glucose: This is the secret to the “glossy” finish. It prevents the sugar from crystallizing and keeps the ganache shiny even after it sets.
1 tbsp (15g) Unsalted Butter, Room Temperature: Whisking in a small amount of butter at the end adds a final layer of richness and sheen.
Equipment Needed for Success
- 9-inch (23cm) Tart Pan with Removable Bottom: Essential for getting the tart out safely and maintaining those “sharp, straight edges.”
- Food Processor: The most efficient way to incorporate cold butter into the dry ingredients for the crust.
- Offset Spatula: Necessary for leveling the pistachio paste and ganache into perfectly flat, professional layers.
- Fine-Mesh Sieve: Used to dust the crust with extra cocoa or to ensure the ganache is perfectly smooth.
- Kitchen Scale: For precision measurements, which are critical in high-end pastry work.
Step-By-Step Instructions for the Ultimate Tart
Phase 1: Engineering the Cocoa Shortcrust Base
In your food processor, pulse the flour, cocoa powder, sugar, and salt until combined. Add the cubed, cold butter and pulse until the mixture looks like coarse sand. Add the egg and pulse just until a ball of dough begins to form. Do not overmix, or the crust will become tough.
Turn the dough onto a lightly floured surface and press into a disk. Wrap in plastic and chill for at least 30 minutes. Once chilled, roll the dough to about 1/8 inch (3mm) thickness. Line your tart pan, pressing firmly into the corners to create that “sharp, straight edge.” Trim the excess dough and chill the lined pan for another 20 minutes to prevent shrinking.
Visual Cue: The dough should be a uniform, deep charcoal color. When you press it into the pan, the edges should look crisp and defined.
Phase 2: Blind Baking for Maximum Snap
Preheat your oven to 350°F (175°C). Line the chilled tart shell with parchment paper and fill with pie weights or dried beans. Bake for 15 minutes, then remove the weights and bake for another 10-12 minutes. The crust should feel dry to the touch and smell intensely of dark chocolate.
Let the shell cool completely before filling. A warm shell will melt the pistachio layer, ruining the clean separation of colors. If you need a savory snack while you wait for it to cool, try these air fryer zucchini bites for a quick, healthy contrast.
Phase 3: Layering the Vibrant Pistachio Center
In a medium bowl, combine the pistachio paste, melted white chocolate, and heavy cream. Use a whisk to combine until the mixture is smooth and a “vibrant lime-green.” Pour the mixture into the cooled tart shell and use an offset spatula to smooth it into an even layer that fills about half the depth of the tart.
Refrigerate the tart for 20-30 minutes. This creates a “skin” on the pistachio layer, which is crucial for preventing the dark chocolate ganache from bleeding into the green center.

Phase 4: Creating the Glossy Ganache Topper
Place your chopped dark chocolate and corn syrup in a heat-proof bowl. In a small saucepan, bring the heavy cream to a gentle simmer (do not boil). Pour the hot cream over the chocolate and let it sit undisturbed for 5 minutes. Gently whisk from the center outward until a “thick, glossy dark chocolate ganache” forms. Stir in the room-temperature butter until fully incorporated.
Pour the ganache over the set pistachio layer, starting from the center and letting it flow toward the edges. Gently tilt the tart to ensure the ganache reaches the sharp edges of the crust. Let the tart set at room temperature for 2 hours, then move to the fridge for a final set.
Expert Tips for a Flawless Finish
- The Clean Cut: To achieve the sharp slice seen in the photography, dip a sharp knife in hot water and wipe it dry between every single cut. This prevents the ganache from smearing into the pistachio layer.
- Vibrancy Hack: If your pistachio paste is dull, add the tiniest drop of natural green food coloring to the white chocolate mixture to emphasize that “lime-green” pop.
- Preventing Bubbles: When pouring the ganache, tap the tart pan gently on the counter to force any air bubbles to the surface, then pop them with a toothpick.
- Gold Leaf Application: Use a dry, clean paintbrush or wooden tweezers to apply the edible gold leaf flakes. Even the slightest moisture on your fingers will cause the gold to stick to you instead of the tart.
How to Store and Preserve Your Masterpiece
The Dubai Chocolate Pistachio Tart is best enjoyed within 48 hours of assembly to maintain the crispness of the crust. Store it in an airtight container in the refrigerator. Before serving, let it sit at room temperature for 15-20 minutes to allow the ganache to regain its silky texture.
Freezing: You can freeze the baked tart shell (wrapped tightly) for up to a month. We do not recommend freezing the fully assembled tart, as the ganache may lose its gloss and the pistachio layer can separate upon thawing.
What to Serve With This Luxury Dessert
Because this tart is incredibly rich, it pairs best with items that offer high acidity or a savory palate cleanser. A glass of dry champagne or a shot of intense espresso is the classic pairing. If you’re hosting a full spread, consider starting with a refreshing italian grinder tortellini salad to balance the heavy chocolate finish of the meal.
For a complete “Dubai-inspired” experience, serve small portions alongside fresh dates and unsalted nuts. The goal is to highlight the luxury of the pistachio without overwhelming the palate.
Frequently Asked Questions
You can, but the crust will be lighter in color and more acidic. Dutch-processed cocoa is essential for that deep, dark charcoal look and mellow flavor.
The secret is adding a tablespoon of light corn syrup or glucose and whisking in cold butter at the end to create a stable, reflective emulsion.
The vibrancy comes from using 100% pure pistachio paste mixed with white chocolate. High-quality pastes use Mediterranean pistachios which have a naturally intense green hue.
Edible gold leaf is available at specialty baking stores or online. Ensure it is labeled as ’24-karat edible’ to be safe for consumption.
Crust shrinkage is usually caused by overworking the dough or not chilling it long enough. Ensure the dough rests for at least 20 minutes in the pan before baking.
The Ultimate Dubai Chocolate Pistachio Tart Recipe
Dubai Chocolate Pistachio Tart: The Ultimate Viral Luxury Dessert Guide
Ingredients
Equipment
Method
- Pulse flour, cocoa, sugar, and salt in a food processor. Add cold butter until sandy, then add egg until dough forms.
- Roll dough, fit into tart pan, and blind bake at 350°F (175°C) for 25-27 minutes until dry.
- Whisk pistachio paste, melted white chocolate, and cream. Spread into cooled crust and chill for 30 minutes.
- Pour heated cream over dark chocolate and corn syrup. Whisk until glossy. Pour over set pistachio layer.
Notes
Ensure pistachio paste is 100% nuts for the best color.
Join the CrispCrumbs Community!
Mastering the Dubai Chocolate Pistachio Tart is a true badge of honor for any home baker. We hope this guide helps you create a dessert that looks just as good as it tastes. Did you get that perfect lime-green layer? Show off your creations!
Follow us on Pinterest for more viral recipe recreations and professional baking tips. Don’t forget to leave a comment below with your results and share this recipe with your fellow chocolate lovers!


